
Most authors who handle their own cover design or work with designers without printing experience discover bleed only when something goes wrong. The book arrives from the printer with white slivers along the edges where the cover image was supposed to extend. Or important text gets cut off because it sat too close to the edge. Or the spine width turned out wrong because the bleed calculations didn’t account for proper print specifications. The cover bleed explained at the level authors actually need covers the practical print requirements that separate professionally produced books from amateur ones. Authors who learn the specifications avoid the printing errors that ruin otherwise good covers.
This post walks through what bleed actually is, the specific measurements that work for different printers and book sizes, and the common file setup errors that produce print disasters.
What Bleed Actually Is
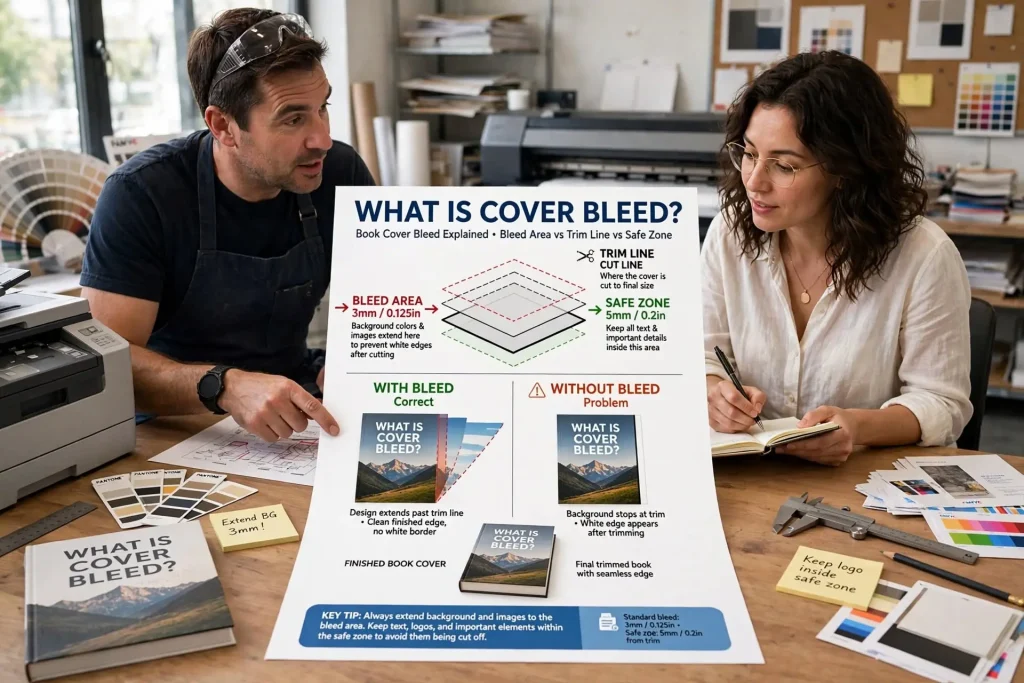
Bleed is the area of cover design that extends beyond the final trimmed edge of the book.
The trim line. The edge where the book gets cut to its final dimensions. A 6×9 inch book gets trimmed to exactly 6 inches by 9 inches.
The bleed extension. The cover artwork extends beyond the trim line by a specific distance, typically 0.125 inches (one-eighth inch). The bleed area is what gets cut away during trimming.
The reason for bleed. Printing machines cut sheets in stacks, and slight variations occur in where the cut lands. Without bleed, any variation in trimming would leave white slivers where the cover image stopped exactly at the trim line. With bleed, slight cutting variations don’t produce visible flaws.
The safety area. The inverse of bleed. The space inside the trim line where important content (text, faces, key visual elements) should sit to ensure it doesn’t get cut off if trimming varies. Typically 0.125 to 0.25 inches inside the trim line.
The total covering. Full cover artwork includes the actual book dimensions, plus the bleed area extending beyond the trim, with key content inside the safety area.
These three zones (bleed area, trim area, safety area) work together to ensure that final printed books look intentional rather than accidentally cropped or revealing white edges.
Standard Bleed Specifications
Different printers have different specifications, but several standards apply across the industry.
KDP Print specifications. 0.125 inches (1/8 inch) bleed on all outside edges. 0.25 inches safety zone inside the trim line.
IngramSpark specifications. 0.125 inches bleed, 0.25 inches safety zone. Similar to KDP but specifically requires that the bleed be set up correctly in the file.
Hardcover with dust jacket. Additional considerations for the dust jacket’s flaps. Front flap, back flap, and main cover area all have separate bleed considerations.
Saddle-stitched booklets. Similar bleed requirements but different binding affects spine handling.
Specialty printers. Each printer publishes their specific bleed requirements. Always check the specific printer’s requirements before producing files.
The 0.125 inches standard works for most paperback and hardcover book printing. Going below this risks white edges. Going significantly above doesn’t help quality but wastes design area.
Calculating Total Cover Dimensions
The final cover file dimensions include the book trim size plus bleed plus spine width for wraparound covers.
Front cover only (ebook). The trim dimensions only. No bleed needed for digital files. Image typically 1600×2560 pixels for Kindle.
Front cover for paperback (file submission). The trim dimensions plus bleed. For 6×9 inch books, that means 6.25×9.25 inch file (adding 0.125 inches bleed on all four sides for the front-only file).
Wraparound paperback cover. The total width includes front cover trim + spine width + back cover trim + bleed on outer edges. For 6×9 inch book with 300 pages on standard cream paper, that might be 12.275×9.25 inches total (back 6 + spine 0.275 + front 6 + bleed 0.125 left + 0.125 right + 0.125 top + 0.125 bottom).
Spine width calculation. Depends on page count and paper thickness. Different paper stocks have different per-page thickness measurements. KDP provides spine width calculators. IngramSpark provides templates.
Hardcover dimensions. Hardcover books have slightly different specifications due to case-bound construction. Print-on-demand hardcovers through IngramSpark or KDP follow specific templates that handle the case-binding requirements.
Getting the calculations right matters. Cover files at wrong dimensions get rejected by printers. Even slightly wrong dimensions can cause the spine text to print on the front or back covers rather than centered on the spine.
File Setup Specifics
Proper file setup involves multiple specifications beyond just dimensions.
Color profile. Print files should use CMYK color space rather than RGB. Computer screens display RGB. Printers print CMYK. Files in wrong color space can shift dramatically when converted.
Resolution. Print files require 300 DPI (dots per inch) at the final printed size. Lower resolution looks acceptable on screen but pixelates in print.
File format. PDF is the standard for print submission. Specifically PDF/X-1a or PDF/X-3 for professional printing. Adobe products (InDesign, Photoshop, Illustrator) export these formats. Free alternatives like GIMP can also produce compatible PDFs with proper settings.
Image embedding. Linked images need to be embedded in the final PDF or accompany the file. Missing linked images produce print errors.
Font embedding. All fonts used in the file must be embedded. Files with non-embedded fonts may print with substitute fonts that change the design.
Black settings. Solid black areas should use rich black (combinations of CMYK rather than just K). Pure black (K only) can look gray in print.
Transparency handling. Transparencies in design files can cause print problems. Flattening transparencies before export prevents issues.
These specifications seem technical but each addresses specific issues that occur in print production. Files set up properly avoid the problems. Files set up incorrectly produce books with various print defects.
Common Bleed Errors
Several specific errors regularly produce print disasters.
No bleed at all. Files set up at exact trim dimensions without bleed extension. Results in white slivers along edges when trimming varies even slightly.
Insufficient bleed. Files with bleed less than the printer’s requirement. Sometimes prints acceptably, sometimes shows edge problems.
Important content in safety zone. Text or important imagery placed too close to the trim line. Gets cut off when trimming varies.
Spine text in wrong position. Spine text that’s not centered on the spine, leaving more space on one side than the other. Looks unprofessional.
Wrong total file dimensions. Files that don’t match the calculated total dimensions including bleed and spine. Get rejected or print incorrectly.
Mixed color spaces. Some elements in RGB, others in CMYK. Produces inconsistent color reproduction.
Low resolution. Files at screen resolution (72 DPI) submitted for print. Pixelated print results.
Wrong file format. JPEG or PNG submissions instead of PDF. Loss of vector elements, font issues, color shifts.
Missing fonts. Fonts not embedded in the PDF. Print uses substitute fonts that change design.
Each error has its own remediation. Print specifications exist precisely because these errors occur regularly and produce visible problems.
Designing Within the Constraints
Cover design needs to account for bleed and safety zones from the beginning rather than treating them as afterthoughts.
Background imagery to the bleed line. Background elements should extend to the bleed boundary so trimming variations don’t create white edges.
Important content inside safety zones. The title, author name, and other key elements should sit well inside the safety zone with comfortable margins.
Spine considerations. The spine portion of wraparound covers needs design that works in the narrow vertical space. Spine text should fit appropriately. Background elements should connect visually across the spine.
Visual elements crossing the spine. Designs where front cover imagery continues across the spine need careful registration. The spine area is the most likely place for trimming variations to cause visible problems.
Page count flexibility. If book length changes between design and printing, spine width changes. Designs that work only at exactly one page count create problems if late edits affect length.
Templates from printers. KDP and IngramSpark provide templates with marked bleed and safety zones. Using these templates eliminates many design errors.
Designers experienced with print production handle these constraints automatically. Designers without print experience often produce files that need correction before printing.
Working With Print Templates
Print templates from printers simplify proper file setup.
KDP template downloads. KDP provides cover templates for specific trim sizes and page counts. The templates include marked bleed lines, trim lines, and safety zones.
IngramSpark templates. Similar template downloads with marked guides. Use the specific template for your book’s exact trim size and page count.
How to use templates. Open the template in your design software. Place your cover artwork within the template guides. The template marks show exactly where each element should sit relative to the bleed, trim, and safety zones.
Template modification. Templates can be modified for specific design choices but the underlying bleed and safety specifications shouldn’t change. Modifications that change these specifications produce print errors.
Updating templates for changes. If page count changes, get a new template with the new spine width. Adjusting an old template manually risks calculation errors.
The templates exist because following them eliminates common errors. Authors handling their own design work should use the templates rather than calculating dimensions independently.
Pre Print Verification
Before submitting cover files for printing, several verification steps catch errors.
Check the file dimensions. Verify that final file dimensions match the expected calculations. Wrong dimensions are the most common print error.
Check the bleed extension. Make sure bleed area exists and extends to the proper distance.
Check the color profile. Verify CMYK rather than RGB.
Check resolution. Confirm 300 DPI at final size.
Check font embedding. Verify all fonts are embedded in the PDF.
Check transparencies. Confirm transparencies are flattened or properly handled.
Print a test proof. KDP and IngramSpark offer proof copies for around $5 to $10 plus shipping. Ordering a proof catches errors before mass printing or before the book goes live for sale.
Examine the proof carefully. Look at edges, spine alignment, text placement, color reproduction. Note any issues that need correction.
Re-submit corrected files. Address any issues found in the proof before approving the book for sale.
The proof step catches errors that file inspection alone misses. The modest cost is worth the protection against shipping broken books to customers.
Bleed Setup as Print Production Habit
Setting up cover files with proper bleed is one of those technical skills that distinguishes professional book production from amateur work. Authors who learn the specifications and apply them consistently produce books that look intentional in their physical production. Authors who skip or shortchange the technical setup often produce books with print defects that signal amateur production regardless of the underlying design quality.
The work to set up bleed properly is straightforward once you’ve done it a few times. The standard 0.125 inches bleed, 0.25 inches safety zone, 300 DPI resolution, CMYK color space, and PDF/X file format work across most printers and most book projects. Authors who build the technical habit into their design process avoid the printing errors that catch unprepared designers off guard. The specifications haven’t changed significantly in years and aren’t likely to change dramatically going forward. Learning them once produces returns across every print book you produce. The investment in technical knowledge pays back through books that arrive from printers looking exactly as designed rather than showing the print defects that proper bleed setup prevents.


